Wisycom
Facts about speech intelligibility
Spoken and sung words should be intelligible. Unfortunatley, it can be technically challenging to retain intelligibility, when recording or amplifying the voice. In this article, we present some facts on speech intelligibility and, most importantly, how to retain it.
Executive summary
Language comes from the spoken word. So when recording the voice, you should always consider speech intelligibility.
Air passes the vocal cords and creates sound. By controlling the vocal cords the level and the pitch of the voice can vary. By affecting the cavities above the vocal cords (pharyngeal, oral, nasal), filtering is added to the voice spectrum.
Changing the vocal effort changes both level and frequency spectrum of the voice sound. Even the pitch of the voice changes with vocal effort. Shouting sounds different from talking with a casual voice.
When recording, you will find that the peaks of the acoustical signal are much higher than then the RMS or average level. Be sure that all peaks survive through the recording chain.
In non-tonal languages the consonants are important. The consonants (k, p, s, t, etc.) are predominantly found in the frequency range above 500 Hz. More specifically, in the 2 kHz-4 kHz frequency range.

We perceive the voice as natural and with the highest intelligibility when we are approximately 1 meter in front of the person talking. Standing to the side or behind the person reduces the naturalness and intelligibility.
Actually, the voice chances spectrum in almost any other position than when we approach the speaking person with our ear – or microphone.
Each position on the head or the chest has its’ own sound color – or timbre. For instance, the spectrum of speech recorded on the chest of a person normally lacks frequencies in the important range of 2-4 kHz. This results in reduced speech intelligibility. If the microphone does not compensate for this you should make corrections with an equalizer.
So when placing a microphone be aware of these issues. Be ready to pick the right microphone designed for use in the position you are placing it. Otherwise be prepared to compensate (equalize) to obtain the correct sound.
You can get a quick head start by watching a series of short videos to introduce and explain some important factors that impact intelligibility of the voice. When you are ready for a deeper dive into the theory, you should check out the full article below the playlist.
The voice as an acoustic sound source
The voice as a sound source is important to understand. While language can be something that groups of people have in common, the sound and character of the voice is individual from person to person. At the same time, speech, regarded as an acoustic signal, is the type of sound that we are most familiar with.
Sound level
Vocal efforts vary; from a subdued whisper to loud shouting. It is hard to assign a fixed number to speech level, as this is individual from person to person. The values in the table below indicate the average A-weighted speech level of the speech of an adult.
It is worth noting that the ability to understand speech is optimum when the level of the speech corresponds to the level of normal speech at a distance of 1 meter. In other words, a sound pressure level of approximately 55-65 dB re 20 μPa. (In this case, “re” means “with reference to”; the reference is the weakest sound pressure level that is audible.)
Speech level
Speech level [dB re 20 µPa]
| Listening distance [m] | Normal | Raised | Loud | Shout |
|---|---|---|---|---|
| 0.25 | 70 | 76 | 82 | 88 |
| 0.5 | 65 | 71 | 77 | 83 |
| 1.0 | 58 | 64 | 70 | 76 |
| 1.5 | 55 | 61 | 67 | 73 |
| 2.0 | 52 | 58 | 64 | 70 |
| 3.0 | 50 | 56 | 62 | 68 |
| 5.0 | 45 | 51 | 57 | 63 |
Average speech level as a function of listening/recording distance. There is nearly 20 dB difference between normal speech and shouting.
Crest factor
Note that each level presented in the table is an averaged RMS level and not a peak level. Typically, the peaks are 20-23 dB above the RMS level. The ratio between the peak level and the RMS level is called the crest factor. This factor is an important parameter when a voice is to be recorded or reproduced in an electroacoustic system.
Also note: Loud singing, measured at the lips, can reach levels of 130 dB re 20 μPa RMS and peak levels above 150 dB re 20 μPa.
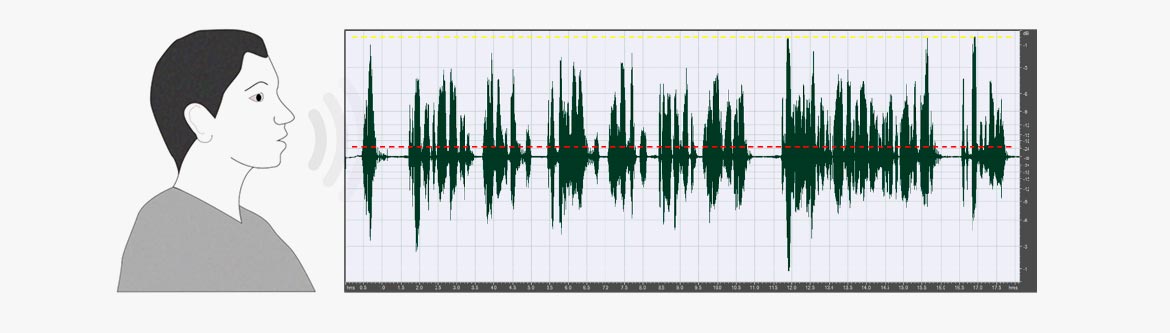
Male voice, normal speak (duration 18 seconds). Average RMS: -21.5 dBFS, Peak: -0.5 dBFS. Crest factor 11 (21 dB). The dotted red line indicates RMS level.
The spectrum of speech
The spectrum of speech covers quite a wide portion of the complete audible frequency spectrum. In non-tonal languages, one can say that speech consists of vowel and consonant sounds. The vowel sounds are generated by the vocal chords and filtered by the vocal cavities. A whisper is without voiced sounds.
However, the cavities that contribute to the formation of the different vowels still affect the passing flow of air. This is why the characteristics of vowel sounds also occur in a whisper. In general, the fundamental frequency of the complex speech tone – also known as the pitch or f0 – lies in the range of 100-120 Hz for men, but variations outside this range can occur. The f0 for women is found approximately one octave higher. For children, f0 is around 300 Hz.
The consonants are created by air blockages and noise sounds formed by the passage of air through the throat and mouth, particularly the tongue and lips. In terms of frequency, the consonants lie above 500 Hz.
At a normal vocal intensity, the energy of the vowels usually diminishes rapidly above approximately 1 kHz. Note however, that the emphasis on the speech spectrum shifts one to two octaves towards higher frequencies when the voice raises. Also, note that it is not possible to increase the sound level of consonants to the same extent as vowels. In practice, this means that the intelligibility of speech does not increase by shouting, compared to applying normal vocal effort in situations where the background noise is not significant.
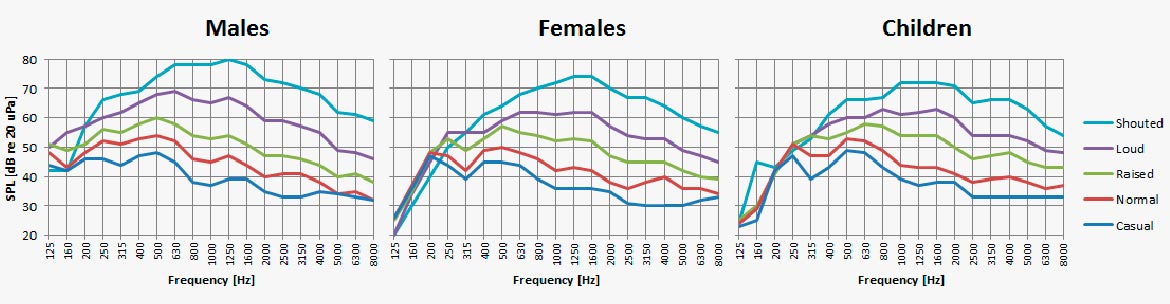
Voice spectra (1/3 octave) depending on efforts.
Formants
If you listen to two people who speak or sing the same vowel at the same pitch (f0), the vowels are presumably recognizable as identical in both cases. However, any two voices do not necessarily produce exactly the same spectrum. The formants provide the perceived vowel sounds. Also, the formants provide information different from speaker to speaker. The formants are explained by the acoustic filtering of the spectrum generated by the vocal cords. Vowels are created by the “tuning” of the resonances of the cavities in the vocal tract.
What affects intelligibility?
In tone languages like Chinese and Thai, the speakers use lexical tone or fundamental frequency to signal meaning.
In non-tonal languages like English, Spanish, Japanese, etc., words are distinguished by changing a vowel, a consonant, or both. However, of these two, the consonants are the most important.
Important frequencies
The important frequencies in non-tonal (Western) languages are illustrated by the diagram below. Here, the frequency band around 2 kHz is the most important frequency range regarding perceived intelligibility. Most consonants are found in this frequency band.
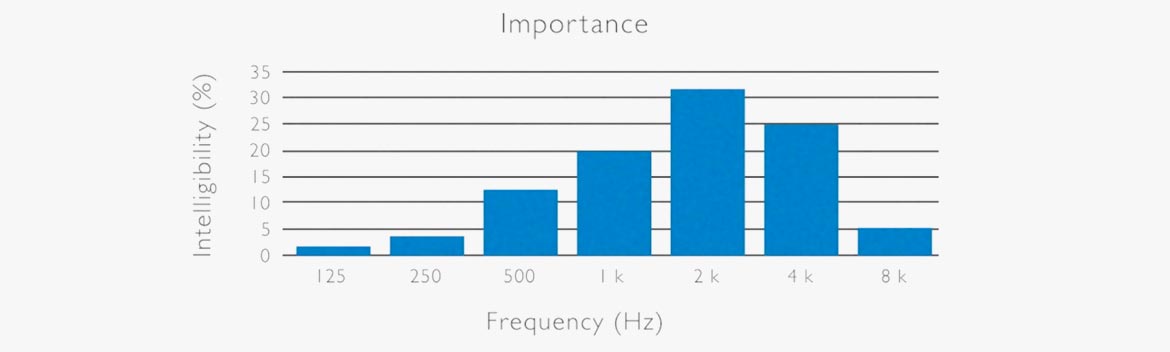
(Ref: N.R. French & J.C. Steinberg: Factors governing the intelligibility of speech sounds. JASA vol. 19, No 1, 1947).
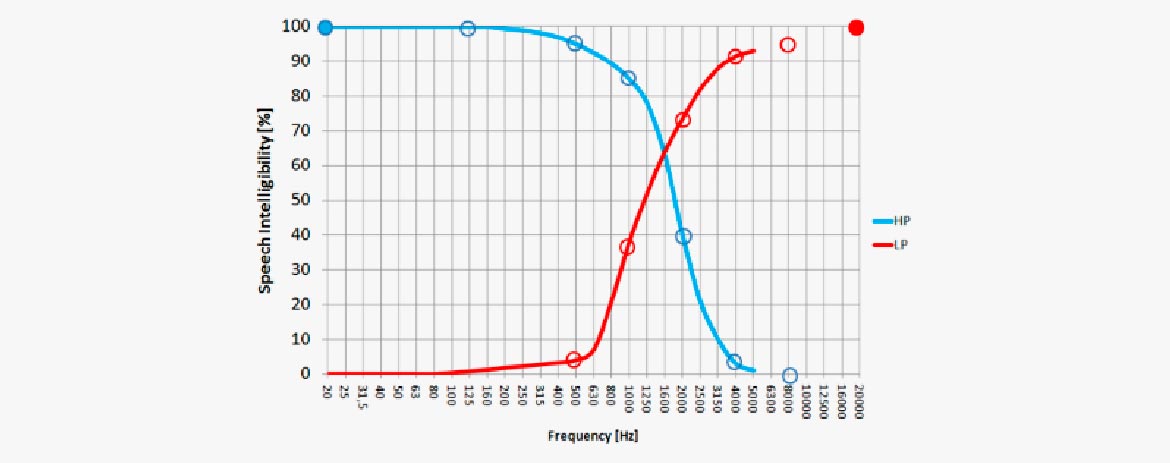
A speech spectrum is either high-pass or low-pass filtered. Using an HP filter at 20 Hz (upper left) leaves the speech 100% understandable. (This is because the complete speech spectrum is there). An HP-filter cutting everything below 500 Hz still leaves the speech signal understandable. Even though most of the speech energy is cut out, the intelligibility is only reduced by 5%. However, applying a higher cut-off makes intelligibility drop.
The other way around, applying an LP-filter makes intelligibility drop very fast. When cutting at 1 kHz, the intelligibility is already less than 40%. It can be seen that the frequency range between 1 kHz and 4 kHz is of high importance for intelligibility.
Background noise
Background noise has an influence on the perceived intelligibility of the speech signal. In this case, all signals other than the speech itself can be considered noise. So in an auditorium or classroom, air-conditioning and other noisy installations can make speech less intelligible. Also, the presence of other people generates noise. In TV or film sound, it is very often a question of the relation between the level of the dialog and the level of the background music/atmosphere sounds.
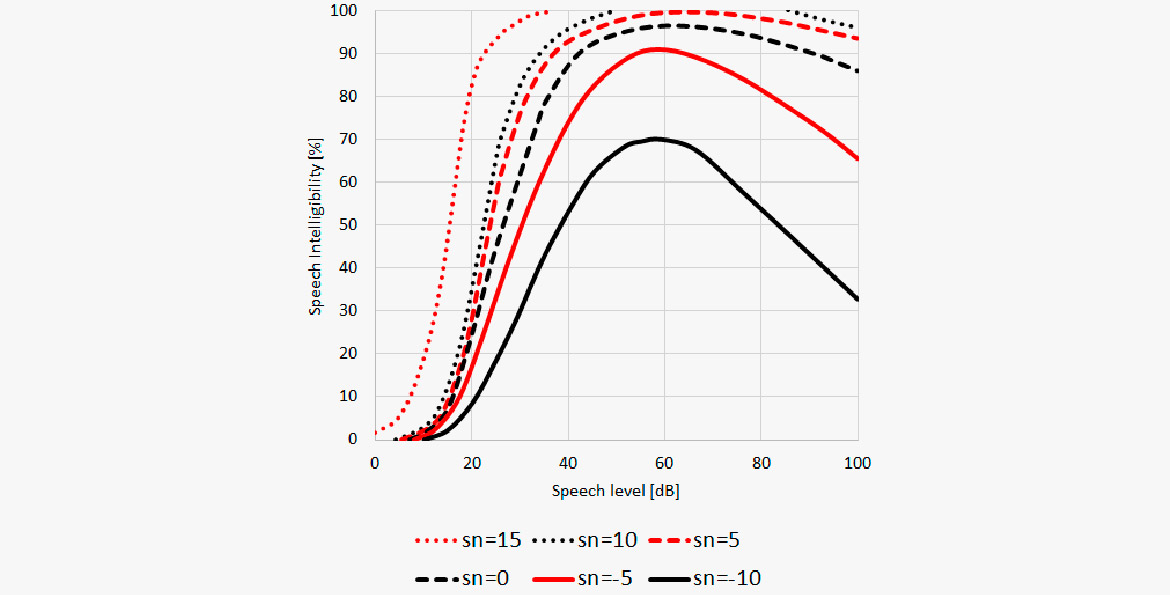
In this diagram the speech intelligibility is plotted against the signal to noise ratio (S/N). The lower curve shows that speech still can be intelligible to some degree even if the S/N is negative, meaning the noise is 10 dB louder than the speech level. But in any case the optimum is a perceived speech level around 60 dB re 20 μPa.
A lot of research has been carried out in this area. In general, the results demonstrate that:
- Optimum speech level is constant when background noise level is lower than 40 dB(A)
- Optimum speech level appears to be the level that maintains around 15 dB(A) of S/N ratio when the background noise level is more than 40 dB(A)
- Listening difficulty increases as speech level increases under the condition where S/N ratio is good enough to keep intelligibility near perfect
Furthermore, the 1-4 kHz frequency range should be “kept clear”. When, for instance, adding music as background for narration, a parametric equalizer cutting the music 5-10 dB in this frequency range will improve intelligibility.
Reverberation
Reverberation is considered noise when talking about speech intelligibility. A little reverb may support the speech, however as soon as the consonants are smeared out, intelligibility drops.
The sound field
The sound field around the person speaking is affected not only by the physics of the vocal tract but also by the person's head and body.
Directivity
Below are polar plots of human talkers in both vertical and horizontal planes.
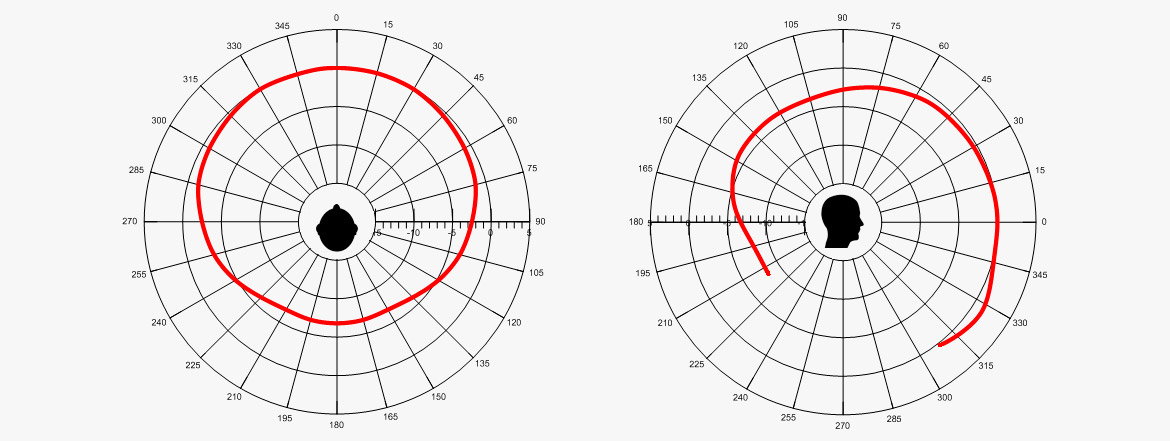
Polar patterns human talker. (ref.: Chu, W.T.; Warnock, A.A.C.: Detailed Directivity of Sound Fields Around Human Talkers.)
The level plotted is A-weighted and both males and females are plotted in each diagram. All talkers were seated. The levels were measured at 1 meter. It can be seen that the difference between front and back is approximately 7 dB. However, this does not provide any information on the frequency dependency: high frequencies attenuated more on the back than lower frequencies.
Please note that in the vertical plane, the level is higher in the 330° direction compared to other directions. This is predominantly because the sound is reflected off the chest.
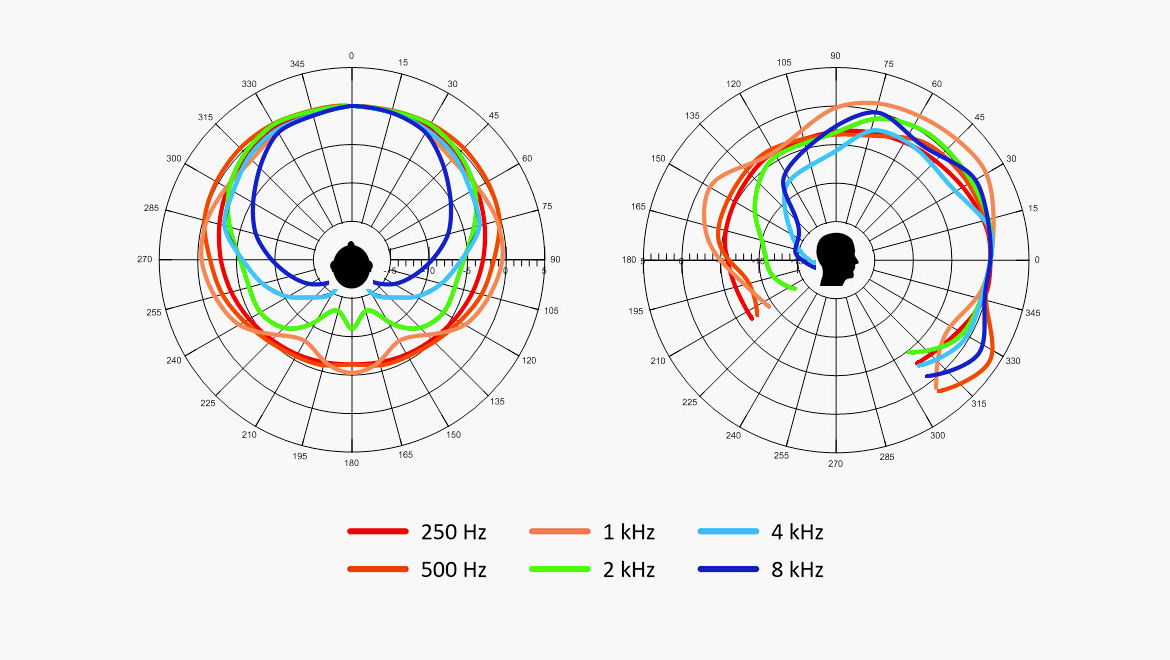
This diagram shows the frequency dependent polar plots from 160 Hz to 8 kHz.
It can be seen that the directivity increases from approximately 1 kHz and up. Combining this fact with the importance of frequencies above 1 kHz it is obvious that higher intelligibility is obtained when recording in front of as opposed to behind the person.
Human talker, polar plots 1/3-octave intervals. Division 5 dB.(ref.: Chu, W.T.; Warnock, A.A.C.: Detailed Directivity of Sound Fields Around Human Talkers.)
Distance and direction
As not all microphones are placed at a distance of 1 meter from the talker, it is interesting to know what happens when we move closer to the sound source.
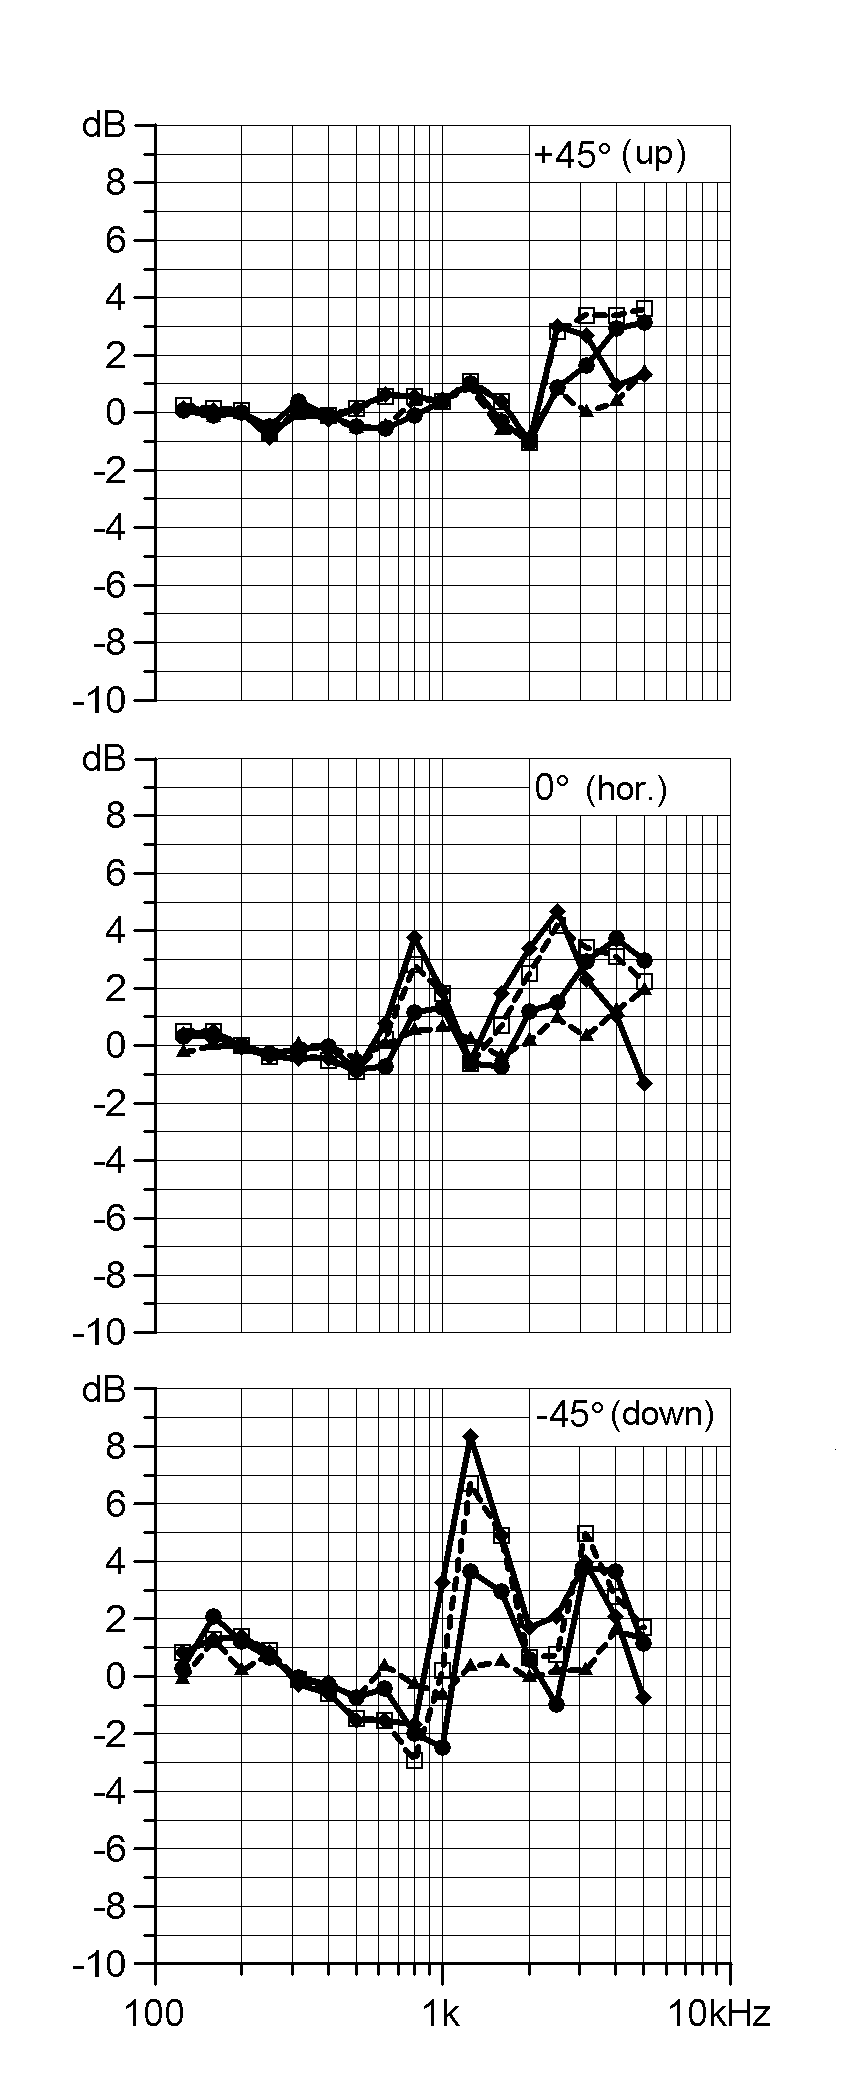
The following diagrams show the deviation from the speech spectrum recorded at 1 meter in the given direction. The angles (+45 degree, 0 degrees and -45 degree) are in the vertical plane. These results are averages of 10 talkers.
The lines in each of the three diagrams show the deviations at 80 cm, 40 cm, 20 cm and 10 cm, respectively.
If there was no change to the spectrum when changing direction and distance, all curves would be straight lines, but the deviation increases as we get closer to the talker.
The upper diagram shows the measurement positions 45°upward from on axis. The deviation from here is subtle. This is why booming overhead provides a stable speech spectrum not so dependent on distance.
The lower diagram shows what happens when we pick up the voice below the on-axis plane. The influence of body-reflected sound is substantial.
The on-axis deviations are somewhat in between the two others, meaning that the spectrum of the speech changes with distance to the microphone.
(Ref: Brixen, Eddy B.: Near field registration of the human voice: Spectral changes due to positions. AES Convention 104, Amsterdam, the Netherlands. Preprint 4728)
Head and chest
In broadcast and live sound applications, the preferred microphone is often a lavalier microphone (chest worn) or a headset microphone (headworn), which allows the user more freedom of movement. One should be aware of the fact that placing the microphone at this short distance results in a recorded spectrum that is different from the natural and neutral spectrum perceived at a normal listening distance. This difference is far from negligible.
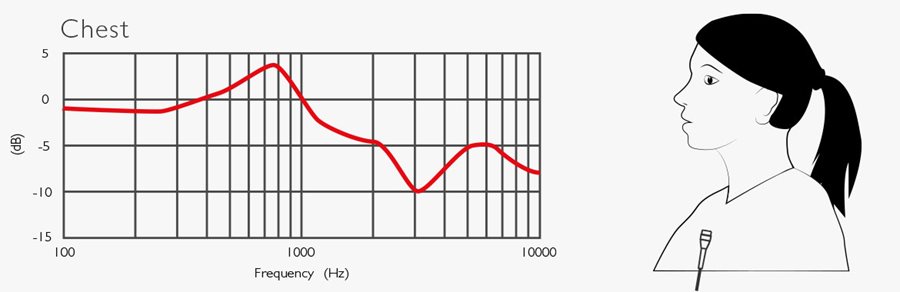
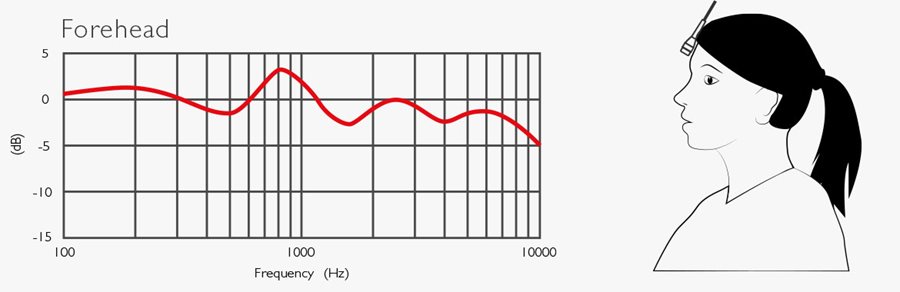
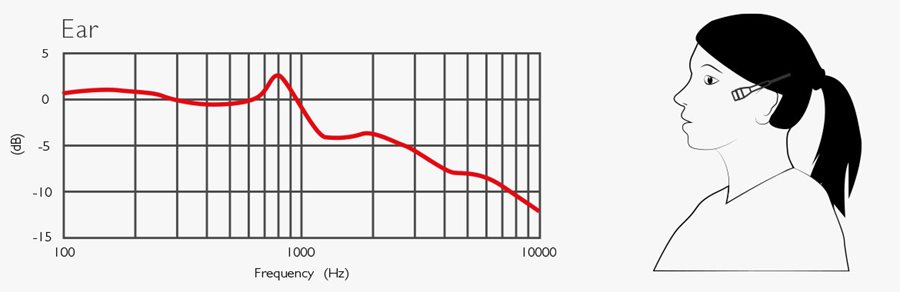
Below are five curves that explain what happens to the speech spectrum when placing the microphones on the body or the head. All curves are based on measurements and are an average of 10 people (see ref).
The upper curve (chest) quantifies the way the speech spectrum picked up at the chest differs from the spectrum of the same person’s speech picked up at 1 meter on-axis. When placing a microphone on the chest, there is a substantial reduction of the frequencies in the critical 2-4 kHz range.
The second curve (neck) shows the deviation if the microphone is even closer, just below the chin. This position applies very much to broadcast because it is the only practical way to place a lavalier microphone if the journalist or the interviewee wears a t-shirt, sweatshirt or the like or if wearing a coat. For outdoor use, the microphone may be dressed in fur or put behind a scarf. Under all circumstances: There is a massive reduction of consonant frequencies.
The forehead curve shows that placing the microphone on the forehead is the least obstructive position to the spectrum. This position is perfect for the stage and film but not for news.
The ear curve shows a gradual roll-off of higher frequencies at this placement. It can be convenient to place the microphone at the ear; however, it needs compensation to retain speech intelligibility.
When placing the microphone at the cheek (headset), the 2-4 kHz range is better off compared to most other positions. However, there is still a need for a lift at the highest frequencies. DPA headsets have a built-in lift.
It should be mentioned that the speech level at “the corner of your smile” (at the cheek) is approximately 10 dB higher compared to a chest position.
From the curves, it can be seen that there is a general tendency of a raise around 800 Hz, which can be considered compensated. However, the most significant deviation is the attenuation that causes reduced speech intelligibility. This must always be taken care of!


(Ref: Brixen, Eddy B.: Spectral degradation of speech captured by miniature microphones mounted on Persons’ heads and chests. AES Convention no. 100, Copenhagen, Denmark. Preprint 4284.)
Placing the microphone
From these conditions, a set of rules can be made for the selection and placement of a microphone whenever speech intelligibility is important.
Vocal handheld microphones
- Vocal handheld microphones should be positioned in front of the mouth within an angle of ±30°
- If using a directive microphone (cardioid-type or shotgun), it should be addressed on-axis (and not like an ice cream cone)
- Too dense windshields may reduce higher frequencies. Remember to compensate for this
Lavalier/chest-worn microphone
The speech spectrum at the typical chest position has a lack of frequencies in the essential range of 3-4 kHz. If a microphone with a flat frequency response is positioned on a person’s chest, the 3-4 kHz range should be boosted around 5-10 dB just to compensate for the loss
- In practice there are two solutions: use a microphone that is pre-equalized to compensate, or remember to make the right equalization in the editing process. Note that no ENG mixers or cameras automatically compensate for this and no controls are provided to do so. In many cases, this is never compensated. Hence, intelligibility is often low
Headset microphone
- The level at the headset microphone is approximately 10 dB louder on the cheek compared to a chest position
- The spectrum is less affected compared to the chest position. However, to some degree, a high-frequency roll off has to be compensated for
- A forehead position (close to the hairline), which is often used in film and stage performance, is relatively neutral regarding speech intelligibility
Podium microphones
- Podium microphones are often used at various distances. Hence, the microphone should be directive, especially in the frequency range above 1 kHz
- The microphone must point at the talkers’ mouth
- Microphones mounted in podiums should not be sensitive to vibrations or any handling noise
Panel microphones (multiple talkers)
- Place each microphone as close to each talker as possible
- Choose directive microphones
- When more than one person is talking at a time, each talker’s microphone should attenuate the sound from other talkers by at least 10 dB
Booming
- When booming, the most neutral spectrum is obtained when positioning the microphone in front of and above the head
- If the surroundings allow, other microphones than shot guns can be used
Noisy/reverberant surroundings
- Position the microphone closer to the primary sound source (talker’s mouth)
- Use a microphone with high-noise suppression, typically a cardioid/supercardioid type