10 points on microphones in installed systems
Permanently installed microphone systems apply to spaces where speech needs amplification. The perfect system should be natural sounding and provide high speech intelligibility. There are many contributing factors to great installed sound systems – including the microphone, room acoustics and background noise. This article will give you tips to ensure that the sound in space is the best it can be.

The purpose of the system
What is a microphone system?
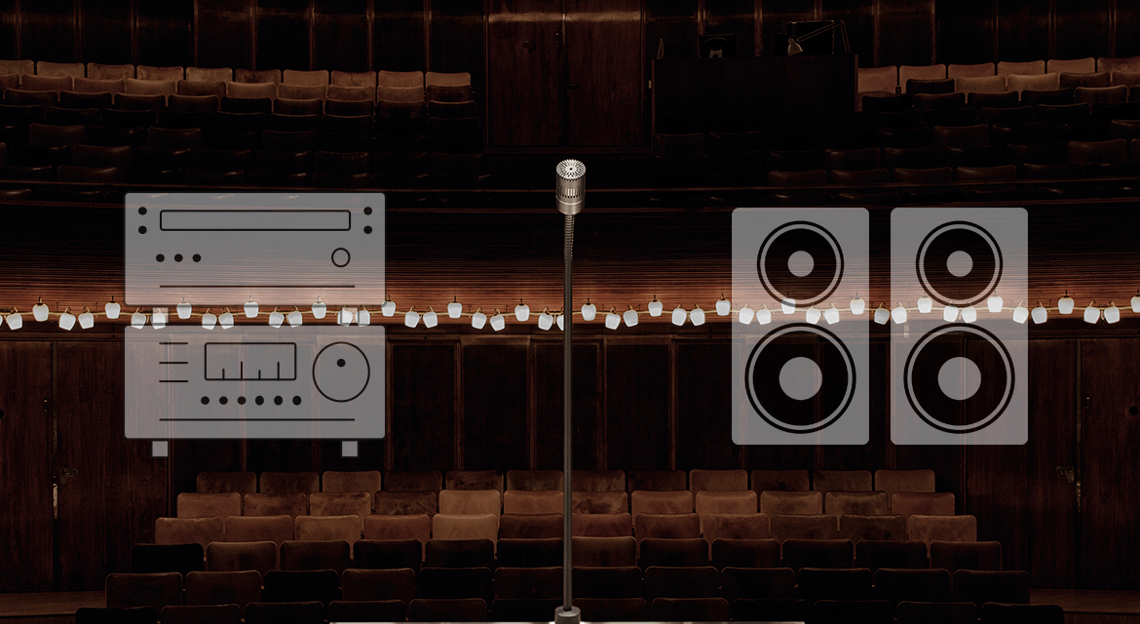
When we talk about microphones in combination with installed sound, we primarily think of permanently installed microphone systems in all types of spaces where speech is amplified: conference venues, lecture halls, houses of worship, courtrooms and so on. A microphone system does not only include the microphones. It also encompasses the rest of the sound chain including preamps, mixing devices, power amps, loudspeakers – and the room itself!
What a good system should do
The aim of the microphone system is to provide sufficient and stable amplification – no audible system noise, natural and distortion-free sound and excellent speech intelligibility. The system should be easy to use. Some systems are manually controlled, however, often they are controlled by some intelligent hardware/software that ensures that the right microphone is turned on at the right time and right level.
What a system should not be
From time to time, less than perfect systems are heard. These exhibit high distortion, poor frequency response, annoying system noise, noise from roaming mobile phones, low intelligibility and unstable amplification resulting in acoustic feedback. The aim of a good system is to minimize these issues.
Acoustics of the room
The room
Microphones alone are not responsible for a perfectly installed system. The room – especially the acoustics of the room – greatly influences the performance of the final system.
Reverberation
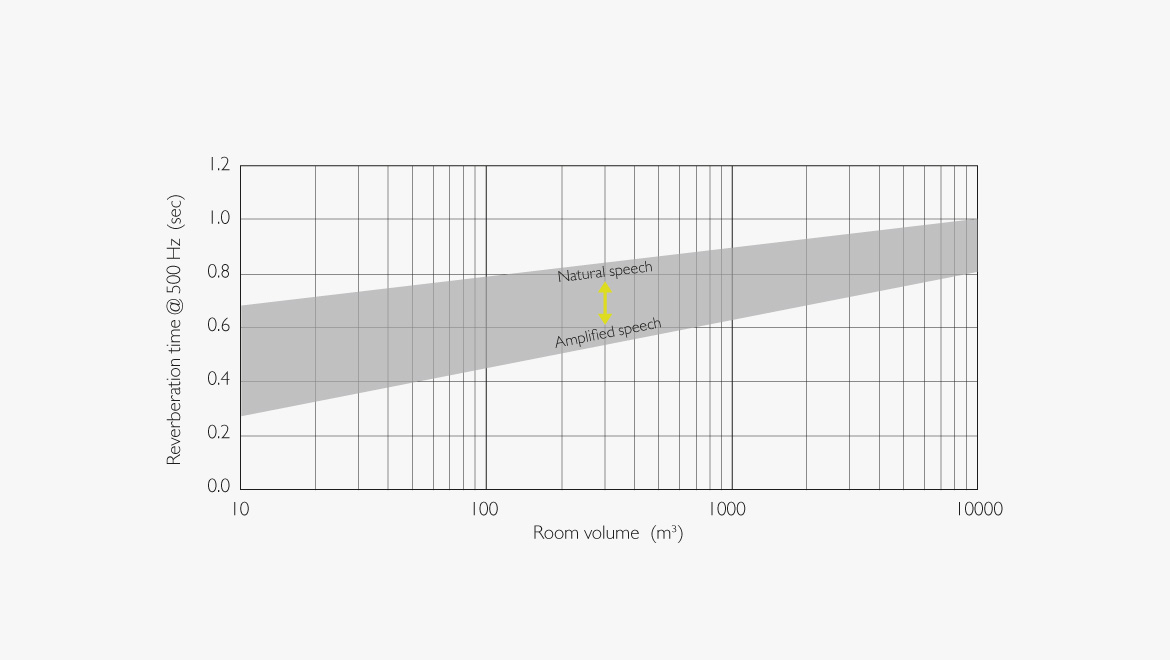
The reverberation time of a room is the time it takes a sound to decay 60 dB after the sound has stopped. We often use the term ‘RT60’. The optimum reverberation time of a room depends on the application of the room. A talk studio should have a short reverberation time (< 0.5 sec). A concert hall for symphonic music is in the range of 2.2-2.4 sec. Ancient churches, often built as large rooms with hard surfaces, can have a very long reverberation time (5-8 sec). In these rooms, it is difficult to achieve high speech intelligibility because the reverberation ‘smears out’ the words.

Regard all late sounds as noise, which reduces the signal to noise ratio of the system. If reverberation is longer than two seconds it can be difficult to achieve high intelligibility. When planning for a good space for speaking applications, consider the room’s reverberation time. A room for natural speech, without electrical amplification, normally has a little longer reverberation time compared to a room with an installed sound system.
Acoustical noise
The acoustical noise in a room comes partly from the outside environment, like traffic noise or vibrations from trains and underground transportation. The quality of the sound and vibration isolation dictates the level of this noise.
Internal noise from installations like HVAC, fans in projectors and power supplies can also be very annoying. Even though people have the ability to block out constant noise sources, this kind of noise reduces speech intelligibility and increases listener fatigue. Fan systems may even produce wind noise in nearby microphones.
Poorly designed loudspeaker systems may also produce hum or hiss because of bad wiring strategy or wrong gain settings. This, of course, should never happen in a quality installation.
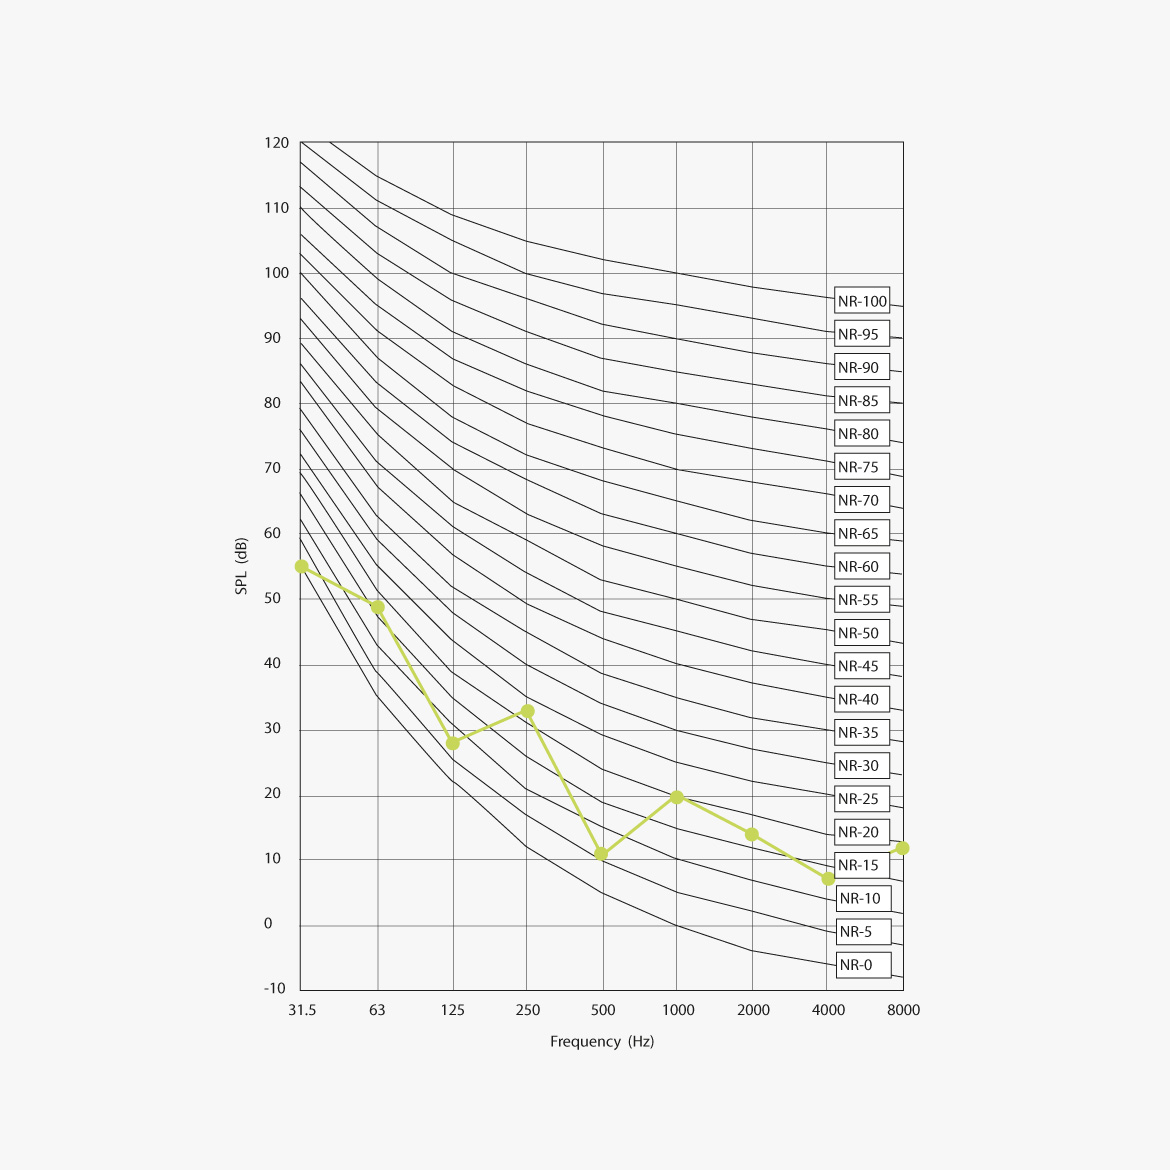
In a room optimized for speaking applications, noise should always be as low as possible. Noise rating (NR) or Noise Criterion (NC) curves are applied to document background noise. These curves also apply when describing room requirements at the beginning of a project. Typical installation noise should not exceed NR/NC-30. Alternatively, A-weighted SPL may apply. On average, the A-weighted sound provides numbers approximately 4-5 dB higher compared to NR/NC. (Example: The NR-25 curve below can be recalculated to 29 dB(A).

Electrical noise
Sometimes electrical noise can become audible. Electromagnetic fields from mains cables, light dimmers and cellular phones can be detected and converted to audible noise. The level of any electrical noise reproduced by the system should preferably be 10 dB below the level of the acoustical noise in the room (i.e. NR/NC 20).
Ultrasonic sensors
One tricky form of noise is the sound emitted from ultrasonic sensors, which commonly work in the range of 30-50 kHz. Most microphones are sensitive to this inaudible sound and its sound pressure level (SPL) is rather high (>100 dB SPL) – often higher than that of a person speaking. Due to this, the ultrasonic sound may activate automatic level circuits. It is important to remove these sensors from rooms with microphones – or at least program them to work at the highest frequency possible.
Where are the loudspeakers?
Loudspeaker distribution
It should be obvious that placing a microphone in front of a loudspeaker that delivers the amplified signal of that microphone is a bad idea. The potential risk of acoustical feedback is high.
The loudspeakers will normally exhibit some directionality – at least at higher frequencies. This should generate less sound behind the loudspeaker than in front of it. Thus, the basic rule is to place microphones behind the loudspeakers or at least off axis.
In systems with distributed ceiling speakers, there is a high risk that the microphones are in front of (just below) a loudspeaker. A common solution is to shut off the nearest loudspeaker(s).
Gain before feedback is an essential parameter in all microphone systems. Remember that the chain includes all the components the system passes – and the room. The longer reverberation time, the higher the risk for acoustical feedback. The more open microphones the higher the risk as well.
Microphone specs
What to look for
The chosen microphone should be able to pick up the voice at the distance it is planned to be used at. Higher directivity helps to reduce the risk of acoustical feedback. The further away a microphone is placed from the person speaking, the higher directivity is needed. The speech level should fit in the middle of the microphones’ dynamic range. No vibrations from mountings should be transmitted via the microphone.
Sensitivity
The sensitivity of a microphone is defined by the magnitude of the output when the microphone is placed in a sound field where an SPL of 94 dB is present.
If the microphone is very close to the person speaking, a sensitivity of 1-5 mv/Pa is fine. If the microphone is further away, a higher sensitivity, of say, 20 mV/Pa is adequate. If a microphone has too low sensitivity, a lot of gain may make the self noise audible.
Sensitivity to breath and mechanical noise
You will seldom find specified data on a microphone’s sensitivity to breath/pop or mechanical vibrations.
If the microphone is very close to the person speaking, noisy breath may become a problem. The solution is usually to equip the microphone with a windscreen or train people to speak directly into the microphone.
Also, the microphone’s sensitivity to mechanical vibrations must be considered. Especially when dealing with table-mounted mics. In this case, the best thing to do is to apply a dedicated shock mount.
Directional characteristics, opening angle, directivity index (DI)
Selecting a mic with the correct directivity is key. In specifications, directionality is often presented as a polar pattern. A cardioid pattern has higher directivity than an omnidirectional and a supercardioid pattern has an even higher directivity than a cardioid. Directivity means that on axis sound is preferred and sound from other directions is more or less suppressed.
In most situations, high directivity is required.
Sometimes directional microphones are described by their opening angle. This is defined as the angle in front of the microphone where the output drops by 6 dB with reference to the on-axis sensitivity. It should be noted that polar patterns and opening angles may change with frequency.
However, not all microphones can be easily categorized by a polar pattern or an opening angle. A better descriptor of a mic is the directivity factor or the directivity index, (DI). A higher number means higher directivity. Directivity index is presented as a function of frequency.
If the microphone is close to the speaker, a cardioid mic is fine (Directivity Index = 1.7 dB). If the microphone is further away, a supercardioid microphone (Directivity ≥1.9 dB) is the better solution.
Types of microphones
Fixed microphones
Microphones in fixed positions, for instance as mounted in tables, lecterns or in the ceiling, are often preferred in installations. Wiring is concealed and the microphone/loudspeaker distance is constant. The only thing that varies is the ‘object’ in front of the microphone – the person speaking – which as a matter of fact, changes the sound field around the microphone.
Handheld microphones
Handheld microphones, wired or wireless, are sometimes a necessity. For trained speakers this is not a problem. However, untrained speakers may hold the microphone at the wrong distance from their mouth or point it in the wrong direction. In many installations, the handheld microphone is just a spare microphone for situations not accounted for.
Headset microphones
Headset microphones are efficient because of their position close to the mouth. This is often preferred for speakers that have to move around the room during their presentations, for instance in front of a white board or a screen.
There are several models of headset mics to choose from. You must consider which features are important. The omnidirectional headset is the easiest to handle because the sound is very consistent (almost) independent of positioning and is the least sensitive to wind/pop and handling. A cardioid microphone must be kept in a stable position.
Dual ear headsets are very efficient. However, the single ear solution often better accommodates microphone changes between speakers and – depending on hair style – does not give the user a bad hair day.
Lavalier types
Lavalier types of microphones are common. It should be noted that the level of speech is some 10 dB lower (compared to a position at the cheek) because the mic is positioned on the chest of the speaker. Another important issue with lavalier microphones is that the 2-4 kHz frequency range, is reduced, which decreases speech intelligibility. Directional lavalier types may apply, however they must be pointed in the right direction.
Placing the microphone
The importance of placement optimization
The general rules of microphone placement are:
- As close to the source (person speaking) as possible (but be aware of heavy breathing and plosives)
- As far as possible from other microphones
- As far as possible from the loudspeakers
- Never directed toward loudspeakers
- No potential possibility to get obstacles between the speaker and mic (like manuscripts)
Table stands
On conference tables and lecturns a mobile table stand can be used – especially if holes cannot be drilled into.
Table mount – lectern / pulpit
A table mount is practical because the microphone has a fixed position. A gooseneck may help to point the microphone in the right direction. The length of the gooseneck is determined by the position of the speaker: standing or sitting.
Floor stand
Floor stands seldom apply in fixed installations. Although a floor stand can provide a base for a handheld microphone.
Ceiling, suspended
Suspending microphones from the ceiling is often a practical solution. The microphones are (almost) out of sight. The microphones are normally also out of reach physically, thus there is no handling noise. Ceiling suspended microphones should be highly directive.
Distance between mics
A common rule (the 1:3 rule) is that when using a microphone, other open microphones should be at least three times further away (from the first mic). This is to prevent colorization of the sound (comb filtering).
Get rid of vibrations
Structure-borne noise
Sound can be transmitted by rigid structures like a tabletop. So if a microphone is placed on a table, the mechanical vibrations caused by objects hitting the table may end up as sound in the system.
To prevent vibrations from entering the microphone, it should be mechanically isolated from the structure it is attached to.
In principle, most isolation takes advantage of elastic suspension. The structure vibrates but the microphone is steady. It sounds easy, however any elastic suspension has a resonance. Hopefully, the resonance is designed to be at a very low frequency, below the frequency range of speech. Below the resonance frequency, the movement of the supporting structure (table or lecturn) and the suspended microphone is exactly the same. At the resonance frequency, the movement of the microphone is much higher than the movement of the structure. Above the resonance frequency, the damping of the elastic suspension sets in.
Table Shock Mount
Error loading Partial View script (file: ~/Views/MacroPartials/TaggedProducts.cshtml)The TSM4001 Table Shock Mount is a very efficient solution for table mounting a lavalier or pencil microphone. It offers the best shock rejection available of any integrated mount. Vertical softness absorbs handling vibration. Horizontal movements are controlled to prevent the podium boom from touching the mount. Best performance is obtained with mics weighing between 140 g (5 oz) and 240 g (8.5 oz).
Shock mounts for stands
It is also possible to apply a shock mount for the microphone on top of a mic stand. This solution works but looks slightly less elegant.
Mixing the microphone signals
Manual mixers
All the microphones must be balanced and turned on/off when needed. A mixing device – and a person behind it – can do the job. However, many installations imply full- or partly-automatic mixing.
Auto-mixers
Most conference rooms are designed to run without any technicians present. Users are left with a small panel to control light, projectors, curtains and sound. When more than one mic is in use there is a need for some control. The auto-mixer is the solution.
Auto-mixers have a built-in sensing of active channels. Active channels are turned on; inactive ones left off. Priority circuits can determine which microphones should be open. An automatic level setting will reduce the level of each microphone as more microphones are switched on.
In larger setups for conferences, priority management can be very complex to allow the right person to speak at the right time.
Connecting the microphones
Noise-free connections
Connections should be completely free of noise. That goes for contacts, switching microphones on/off, etc. The wiring (and the mics) should not pick up and reproduce any electromagnetic noise, neither LF nor RF. Nothing is more annoying that unwanted sound in the system.
Cables
Some microphones may have unbalanced cables (miniature microphone housing without a built-in connector). However, the unbalanced cabling should be kept as short as possible. The main analog audio cabling should always be balanced.
Wireless applications for installation
Wireless transmitters can be applied for all bodyworn microphones. Microphones in movable pulpits can also benefit from applying wireless systems. This leaves the stage free of wires.
Digital Network
Conference systems with digital signal distribution are getting more common. IP-addresses are assigned to the individual microphones or the microphone bases. Still, signal distribution has to be done correctly.
System check and calibration
Polarity of the microphones
According to the standards, microphones should deliver positive voltage on the “hot” pin for positive pressure in front of the diaphragm. Unfortunately, some microphones are manufactured to deliver negative voltage for a positive pressure. If all microphones in an installation have the same polarity – positive or negative – this is not a problem. However, applying a mixture of types may cause problems. Check the polarity of all microphones with a polarity checker or the like.
Gain setting (gain before feedback)
A microphone system should be stable with no tendency to create acoustic feedback. Unfortunately, feeds may still occur. A good rule is to leave some headroom in the system. Especially in cases where the people speaking move very close to the microphone. The presence of any object like the head or torso of a person may change the apparent directivity of the microphone. Further, all microphones in a line, for instance covering a panel, should have the same sensitivity to enable easy gain setting.
Number of open microphones
The number of open and amplified microphones should be kept at a minimum. Doubling the number of open microphones reduces the headroom by 3 dB. Also, more open microphones pick up more background noise from the room.
The absolute level
The purpose of the microphone system is to bring the voice of the person speaking closer to the listener. This is why the reproduced SPL should not exceed conversational SPL. Also worth knowing: speech intelligibility decreases when the listening level exceeds approximately 80 dB SPL.
High quality microphones, proper calibration and alignment makes the sound system work at its best.


