Wisycom
The basics about comb filtering (and how to avoid it)
What is comb filtering?
Comb filtering occurs when a sound adds to itself within a short time interval. This interval typically ranges from less than one ms to approximately 25 ms. Comb filtering can emerge in two ways:
- Due to reflections
- Because more than one microphone is open and picking up the same signal at different positions.
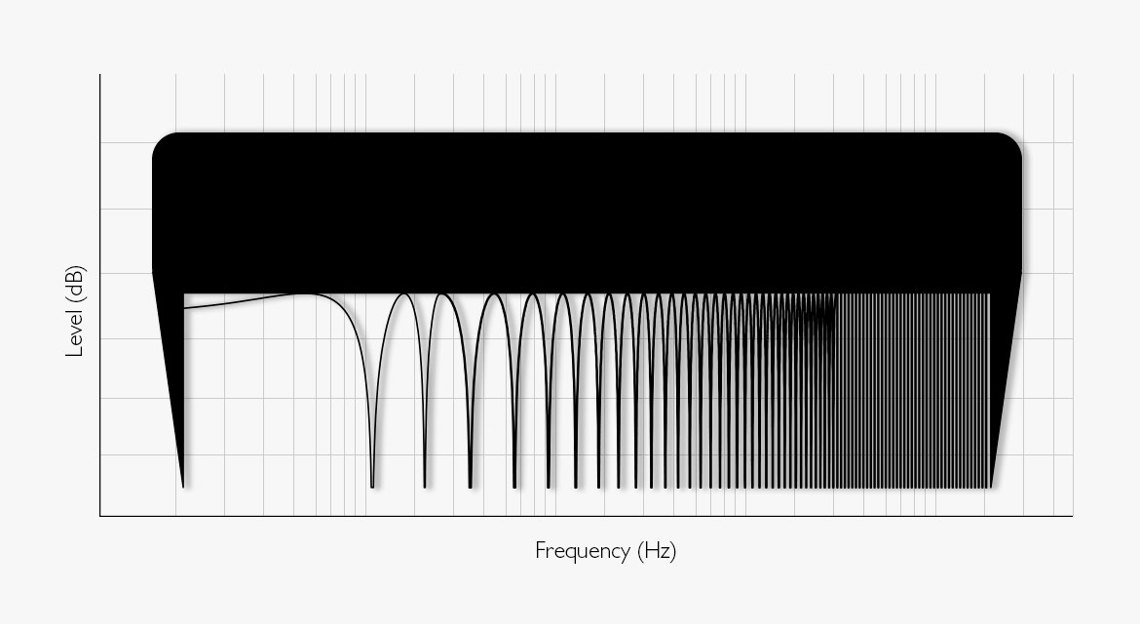
In addition, in order for comb filtering to occur, the levels of the signals must be within 10 dB from each other. This phenomenom is called comb filtering because the effect acts as a filter with a frequency response looking like a comb for the hair.
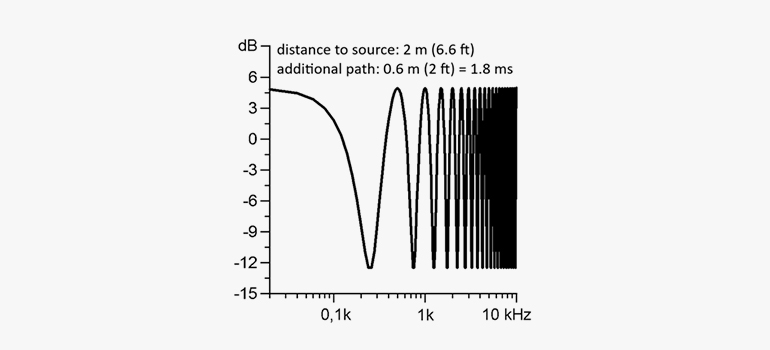
This curve shows the resulting filter response of a direct sound and a delayed sound when added. This filter function could be the result of a single reflection picked up by the microphone or it could be the result of adding the signals of two microphones of which one is 0.6 m (1.9 ft) further apart compared to the other.
Comb filtering caused by reflections
Sound is reflected when it hits hard surfaces, like a floor, a wall, a window - or even when the sound hits a water surface.
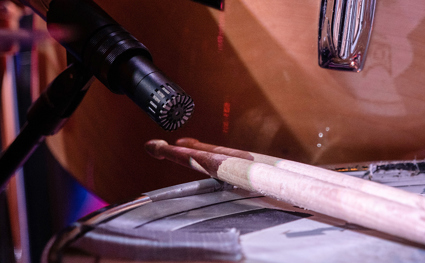
When making a recording setup, it is important to look for reflecting surfaces near the microphone. Even the musical instruments, such as a piano, a cello, a double bass, a kick drum, etc., that you are recording may act as reflectors. In addition, loudspeaker cabinets and amplifiers can generate comb-filtering challenges.
Choosing directional microphones can help, but you should always prioritize better positioning.
In film sound, it can be a problem to record the dialog of people talking facing a window, whether they be in a room, car or other setting.
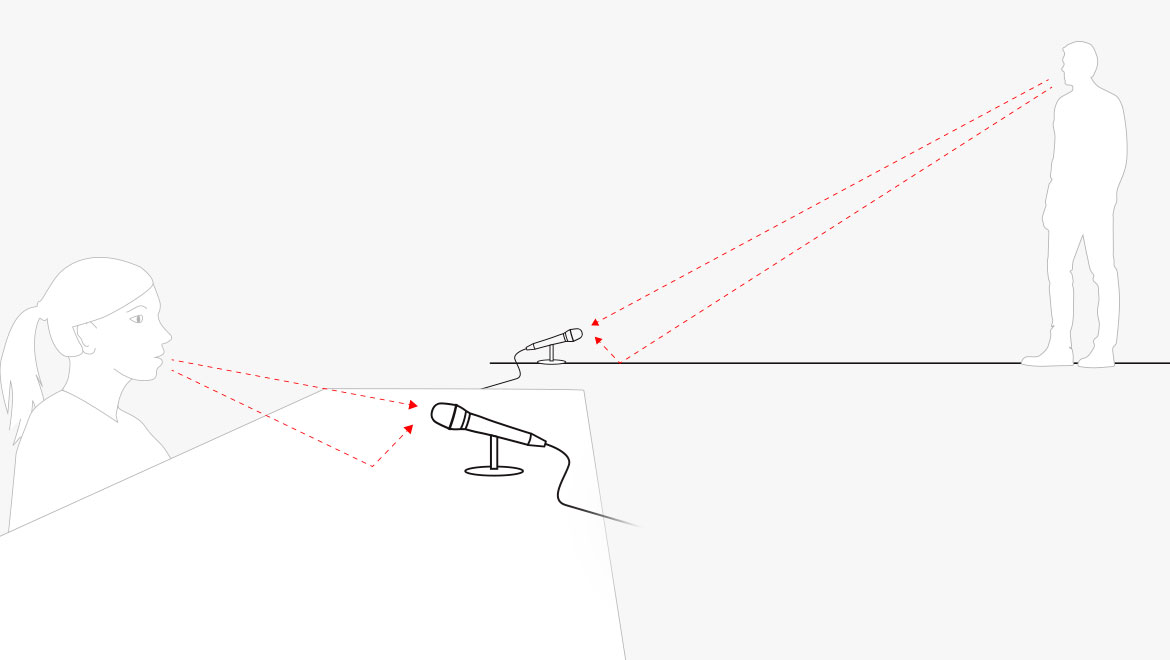
Reflections from nearby surfaces cause comb filtering.
In situations where you, for instance, are measuring the frequency response of a PA-system, you will also experience the comb-filtering problem. You may have heard it at an empty venue, if the system is playing pink noise, when walking the empty floor from the back to the front it sounds more or less like a jet plane taking off. (The problem disappears when an audience fills the floor).
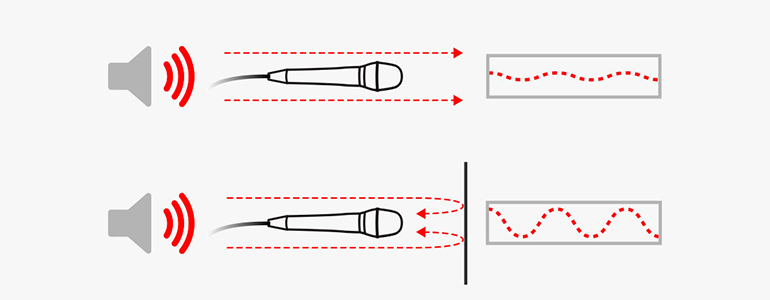
Top: The microphone points its "deaf end" at the sound source and only a small amount of sound is picked up (off-axis). Bottom: A reflecting surface makes the sound bounce back into the microphone’s sensitive end (on-axis).

Pink noise from a loudspeaker is recorded by a 4011 Cardioid Microphone from its' backside. Then a guitar body is put in front of the microphone perpendicular to the direction of the sound field. Now the sound is reflected back into the front of the microphone. This is done twice. The distance between loudspeaker and microphone is 1.5 m (4.9 ft). The distance between guitar body and microphone is 10 cm (3.4 in).
The same as above; however, now the guitar body is put in front of the microphone at reflecting angle of 45° to the direction of the sound field.
Comb filtering caused by several open microphones
The other way to create comb filtering is by having more than one microphone open simultaneously. In a talk studio, sometimes you can hear that the host’s microphone may sound a little muddy, while the interviewed guest’s microphone sounds much cleaner. Why? The host is speaking loud, so the host’s microphone is somewhat attenuated. The guest may speak in a weaker voice; thus, this microphone is turned up. So, the voice of the host is picked up by two microphones with some distance between them. The guest is literally only picked up by the nearest microphone as the other microphone is further away and even attenuated.
In addition, microphone setups for panel discussions or choir setups may generate the filtering. In fact, the problem even exists when using headset microphones on stage – the voices of two actors standing close may be picked up by both microphones.
Avoiding comb filtering
If the problem is caused by reflecting surfaces, you can remove the reflector. However, sometimes it is enough to turn/move the reflecting element and redirect the reflections. Furthermore, using absorbing material on the reflecting surface may help.
In some cases, it is possible to place the microphone so close to the reflecting surface, that there is no delay between the direct sound and the reflected sound. In the instance mentioned above of a person looking out the window while talking, or in the car, it is sometimes better to place the microphone on the window glass or the windshield. In this way, it becomes a boundary layer microphone.
If several open microphones are causing the comb filtering, there is a (golden) rule: Attenuate delayed sound picked up by the microphone by at least 10 dB to minimize the problem of comb filtering.
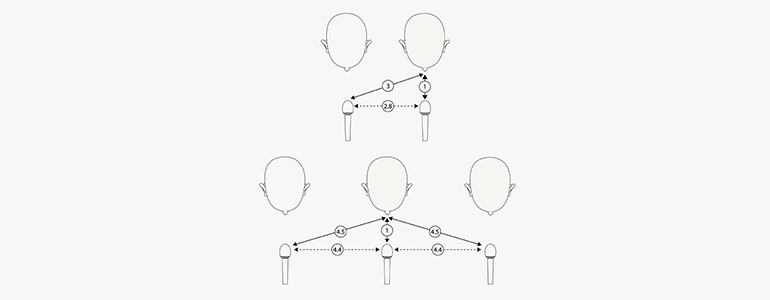
The 3:1 rule
As mentioned, when several microphones are used simultaneously, the same sound source is often picked up by more than one microphone.
In this case, the distance between the sound source and microphones comes into play. The golden rule is that a neighboring microphone should be at least three times further away, (given the sensitivity and the gain is the same on both microphones).
(20 *log (1/3) ≈ -10 dB).
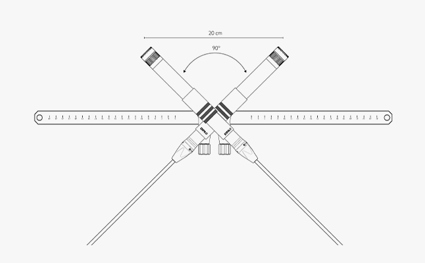
However, if you arrange two or more microphones at an equidistant lineup, the distance between the source and the neighboring microphones, in theory, should be 4.5:1 (again given the sensitivity and the gain is the same on all microphones).
However, when using directional microphones, the directionality of the microphones comes into play. In this case, a distance factor of 3 is normally ok even though there are two neighboring microphones. So, apply the rule like this: The distance to neighboring microphones should be at least three times that of the distance to the primary (nearest) microphone.
As mentioned, the sensitivity and the gain of the individual microphones play a role. If one microphone has a higher gain than the other microphones, it will pick up more of the distant sound.
What comb filtering sounds like
The file contains a male voice originally recorded in mono. The signal is added to itself at the same level and with a delay of 0 ms, 1 ms, 10 ms, 20 ms, 50 ms, and 100 ms respectively.
Notice that the sound is clear and well defined when the added sound is not delayed. However, at a 1 ms delay, the timbre of the sound is colored. Increasing the delay makes the sound more “robotic”. When the delay is 50 ms, the ear begins to perceive the delayed sound as an echo, which is even more evident at 100 ms delay.
The file contains a male voice originally recorded in mono. The signal is added to itself at a reduced level (5 dB attenuation), and with a delay of 0 ms, 1 ms, 10 ms, 20 ms, 50 ms, and 100 ms respectively.
The coloration of the 1 ms delay is now less noticeable. However, when the delay increases the effect of the delay is still very audible.
The file contains a male voice originally recorded in mono. The signal is added to itself at a reduced level (10 dB attenuation), and with a delay of 0 ms, 1 ms, 10 ms, 20 ms, 50 ms, and 100 ms respectively. Notice that the 3:1 rule provides a 10 dB reduction at the microphone that is three times further away.
The coloration of the 1 ms delay is now almost unnoticeable. However, when the delay increases the effect of the delay is still audible.
The file contains a male voice originally recorded in mono. The signal is added to itself at a reduced level (15 dB attenuation), and with a delay of 0 ms, 1 ms, 10 ms, 20 ms, 50 ms, and 100 ms respectively. Notice that the 3:1 rule provides a 10 dB reduction at the microphone that is three times further away.
The coloration of the 1 ms delay is inaudible. Even the 10 ms and 20 ms delays are hardly noticeable. However, when the delay increases to 50 and 100 ms, the effect is still clearly heard.
General rules from psychoacoustics
We know from various psychoacoustic studies that any delayed sound that arrives within the first 15 ms after the direct sound (for instance in the form of a reflection or recording by two microphones on one channel) should be attenuated by 15 dB. Another rule (from another study) is that all reflections within the first 20 ms should be attenuated by at least 20 dB.
Why we only use a 10 dB reduction in the general microphone technique is due to the fact, that often other sounds sufficiently mask the coloration, especially in sound reinforcement.
Delay due to 3:1 rule
In the diagram below, you can see the delay between two microphones of which one is placed three times further away compared to the nearest microphone (according to the 3:1 rule). The calculation is based on normal room temperature (20⁰C/68⁰F).
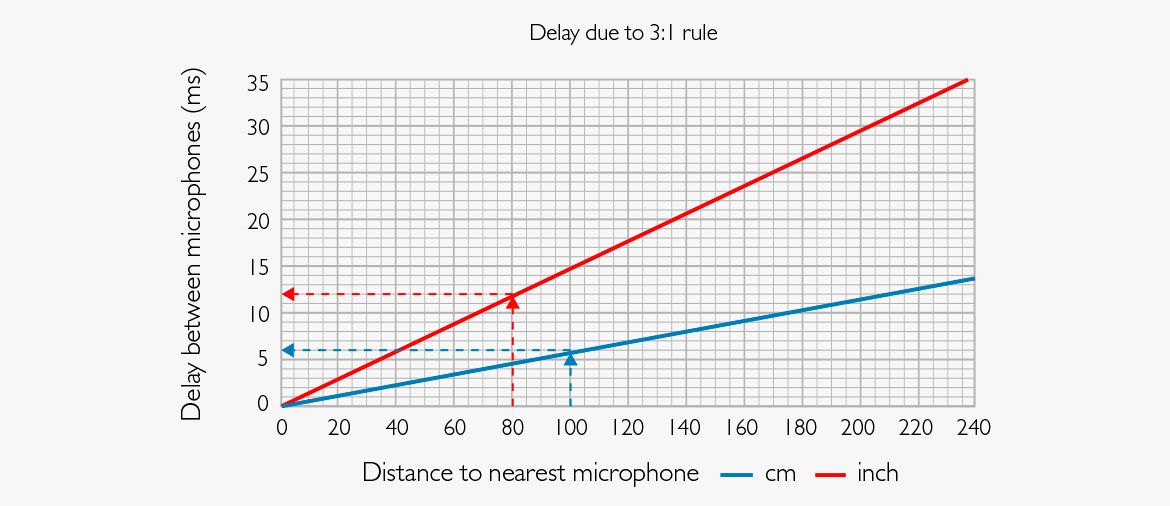
How to use this diagram:
Define the distance to the nearest microphone and find it – cm or inch – on the X-axis.
From that point go vertically upwards until you hit the curve (blue if you use cm or red if you use inches). Now, look at the corresponding value on the Y-axis to find the related delay.
Example: The distance to the nearest microphone is 100 cm (hence, the distance to the second microphone is 300 cm). The blue curve at 100 cm corresponds to a delay of 6 ms.
References
[1] Hass, H: Über den Einfluss eines Einfachechos auf die Hörsamkeit von Sprache. Acoustica. (1951).
[2] Brixen, Eddy B.: Audio Metering. Focal Press/Routledge, 2020. ISBN13: 9781138909113.
[3] Brixen, Eddy B.; Voetmann, Jan: Electroacústica Práctica. Editorial Tebar. ISBN 978-84-7360-482-6, 2013. ISBN 978-84-7360-625-7, 2018.